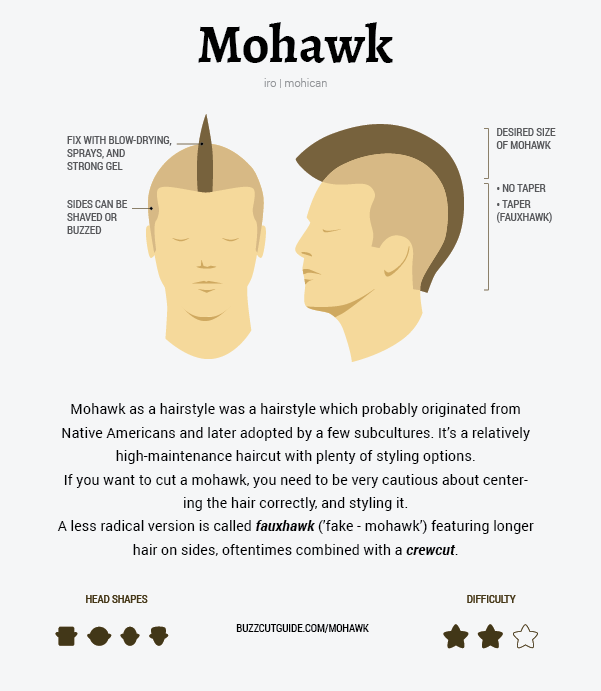
Mohawk, also known as iro or mohican as hairstyle probably originated from Native Americans and later adopted by a few subcultures. It’s a relatively high-maintenance haircut with plenty of styling options. A less radical version is called fauxhawk (’fake – mohawk’) featuring longer hair on sides, oftentimes combined with a crewcut.
What you need for a mohawk
To cut a mohawk, you need somewhat longer hair (it should preferably be more than 1 inch length). Before cutting, decide on how you plan to stylise it – are you going to gel it or let it lay (lazyhawk)? In this case you might prefer doing an undercut instead.
You might find it handy to keep a comb near by to help you disentangle and separate the hair, and a pair of scissors for the final trimming and touch up’s. Obviously, you’ll need hair clippers, but that’s about it.
Pro tip: You can try dyeing your mohawk. Here is a list of great temporary hair chalks to try out a few styles before comitting!
Centering your mohawk
First, you need to be very cautious about centring the hair correctly. Start with forming this central part with the help of a comb, and worry about the lower parts later. Use any lower number of guards (for example #2 or #3) to buzz your hair off on each side of the mohawk.
This tutorial suggests a very good idea for centring your mohawk – by simply using a piece of masking tape. What you need to do is simply stick a long piece of tape on the top of your head, align it until you’re happy with it, and then you’re ready to clip your hair on the sides following these lines.
Cutting the sides
If you’re unsure about your DIY skills, you might want to take your time and start by using a higher number of guards first. This way you are able to cut the sides shorter and shorter as you go. If you’re confident enough about your skills (don’t worry if you’re not there yet, we’ve got your back!), go ahead with a lower number of guards. Just remember, mohawks demand a lot of precision, so better do it carefully and as slowly as needed for the perfect end result. When you got the mohawk about right, use a shorter sized guards to fade your way down to sideburns and back hairline.
Depending on the length of the central section of your hair, you might want to trim it too. Do this with a pair of scissors rather than using clippers after you clipped the sides. This will prevent you from cutting too much and eliminating the contrast between the central section and the sides.
How do I make my mohawk stand up?
People use gel, spray, blow dryer, or even starch or sugar to make their mohawk stand up. The best option for you will depend on your hair type. If your hair is thick, curly and/or dry, pomade or wax might suit you better than gel or spray that tend to dry hair.
When you’re done with clipping and trimming, wash your (remaining) hair.
While it’s still wet, put your head upside down and blow-dry it. This will add more volume to the central section. Then, while still standing with your head between your legs, apply your favourite stylising product. Depending on the length, use (a lot of) hairspray and let it dry like that for a while. THEN you may lift your head back up and you’re ready to rock that mohawk.
How to dye my mohawk?
If you’re going to dye your mohawk after cutting your hair make sure you don’t wash your hair afterwards and don’t use any stylising product just yet, as you’ll want your hair to absorb more colour pigment.
If you’re choosing a fantasy colour (e.g. purple or green), or if you’re going for a light blonde, you will need to bleach your hair first by mixing bleach powder and developer (peroxide). Mix the bleach powder and the developer in a plastic bowl until the mix has a yogurt consistency, put on some gloves, and spread the product on your hair with the help of a tint brush.
Make sure you don’t let the bleach sit for too long, so that you don’t burn your scalp! If you’re not used to bleaching stick with a lower developer volume for the first times. Since the roots of your hair bleach much faster, you might be done with bleaching in 10-15 minutes.
After this, wash out your hair carefully and you’re ready to apply the dye. Fantasy colours like the ones of Manic Panic don’t damage your hair. Actually, they are extra gentle to your hair since they are completely vegan. Let it sit for a while and check in regularly until the desired colour.
Wash out your hair again and apply conditioner or a hair mask. After drying your hair with a towel and/or blow drying it, you are ready to stylise your hair by following the instructions above.
Examples of Mohawk


Hi everyone. I have also a Mohawk Haircut. Middle, left and right shaved. There are fun to have one. And my hair is short.
I am a red head but have to dye to keep it that way. For the 1st time I want to Dye the hawk burgandy. How do I dye part red and the hawk burgandy without mixing
If you mean you want the sides and the main hawk to be different colors, then you have a few options…
A couple of the simplest would be to apply each color while having the opposing sections covered with foil (just laying a sheet of foil flat along the surface of the hair with the edge lined up with the parting, all held in place with clips should work just fine) You’re still gonna want to work carefully, trying your best to “color inside the lines,” as the foil is by no means an impenetrable barrier.
And speaking of “barriers,” another good option would be to use what is known as a “barrier cream.” This doesn’t even need to be a specialized product (although a few do exist.) Petroleum jelly will work just fine. In fact, that’s usually the main ingredient in most color barrier creams you will find. Just take that and apply it somewhat liberally to the hair along the parting line between the two different color sections. You shouldn’t need to go any further than where you risk accidentally overlapping the colors. And again, still try to be as careful and accurate as possible when applying your color (as well as the barrier cream itself. Remember, color will not take anywhere that stuff touches!) This method does mean you will have to do each color in a separate process, though, so it will take up a bit more time to alternate which section has dye and which has barrier cream applied, with rinse and dry times in between.
You can even use these two methods together, for extra protection. Just apply the barrier cream and then clip the foil directly on top of it, all exactly like you would if you did either one of the methods individually.
I know this is quite a few months after your initial post, but hopefully it can still help you or anyone else. Best of luck!
[Oh. And for the sake of credibility, this advice is coming from my past decade’s worth of experience working as a professional & licensed cosmetologist, as well as who knows how much longer experimenting with my own crazy hair colors]
You mean the short, shaved part red, right?
If I was doing two colors, I would pull the hawk away from the shaved part, hold it back with a clip or my hand, and use a tint brush or paint brush to get the roots on the edge burgundy before carefully releasing it and kneading the burgundy through the rest with my fingers or a wide-toothed comb. Then, twist it up and clip it out of the way, and using a different, clean paint brush, get the edges of the shaved area red, before using a bigger paint brush or my fingers to do the rest.
And then, when your timer’s finished and you’re in the shower, rinse the sides or back section first if you can, going up towards your forehead. This will prevent the colors bleeding into each other.
I just remembered that some people rinse their hair looking down, facing the faucet. If you do that, rinse the top section by your forehead first. And after everything’s been rinsed pretty well, you can shampoo.
I need a no-sulfate paraben free Fast Hair Growth Shampoo
Oh yeah u do